• Skip to primary navigation
  • Skip to main content
  • Skip to primary sidebar

MmGood

Lifetime Recipes Made Easy

  • Home
  • Food Blog
  • Recipes
  • Travel / Food Reviews
  • Product Reviews
  • Contact
Home » Food Blog

Food Blog

Chicken with Tarragon Recipe

June 9, 2012 By Patty Limatola-Tanenbaum Leave a Comment

I love the herb tarragon…I think it transforms your meals, it has a bit of a anise flavor but it does not have an overwhelming flavor…So, I thought why not make my chicken with some tarragon, some Greek yogurt (trying to cut down in calories) and I ended up making this amazing meal.

If you are planning a party, this is a great dish because you can prepare it in advance and just heat and serve when your guests come over.  I think next time I will pound my chicken and make it as I think this sauce will compliment that type of chicken.

Let me know what you think!

Print
Chicken with Tarragon

Ingredients

  • 1 tablespoon Butter
  • 1 tablespoon Olive oil
  • 2 pounds Chicken breasts, skinned and boneless
  • 1 teaspoon Garlic powder
  • Salt & pepper to taste
  • 1/2 cup Chicken stock
  • 3/4 cup Dry white wine
  • 2 teaspoons Garlic, minced
  • 8 ounces Greek yogurt
  • 1/4 cup Tarragon, fresh
  • Lemon juice

Directions

  1. If you have large pieces of chicken (like I did), cut them in half and sprinkle the salt, black pepper and garlic on it.
  2. In a large skillet on high heat place your butter and olive oil, place your chicken, season side down in your pan. NOTE - do not over crowd your chicken as this will create steam for your chicken and you are looking for a good color on them so do them in batches. Season the top of your chicken with the remaining salt, black pepper and garlic powder. Cook for 3-5 minutes per side. Remove chicken and put the remaining chicken in your pan to brown. Continue with browning.
  3. Put all your chicken back in the pan and add your chicken stock, reduce your heat to medium, cover and cook for 20 min.
  4. Remove your chicken from the pan and reduce any leftover juices, you are looking for the juices to look "sticky". Add your wine and garlic and reduce your sauce again for an additional 5 minutes. Add your yogurt and only 1/2 of the tarragon. Cook uncovered and refuse your sauce again for 3-5 minutes.
  5. Adjust your seasonings with salt & pepper...add your lemon juice. Place your chicken on a platter (I cut mine into pieces), pour your sauce over the chicken, sprinkle the rest of your tarragon...and enjoy!
3.1
https://mmgood.com/chicken-with-tarragon-recipe/
Recipe belongs to Patty @MmGood.com, please contact me to use for personal use

Filed Under: Chicken, Dinner Entree, Main Meals Tagged With: chicken, delicious, dinner, easy, elegant, mm-good, mmgood, recipe, recipes, tarragon, yum

Quinoa and Black Rice Cakes

June 3, 2012 By Patty Limatola-Tanenbaum 1 Comment

I love grains…there I said it!  I could eat them everyday with veggies…if I could be a vegetarian I would but it just doesn’t work for me.  Last week at work, we served both a quinoa (pronounced “qin-wah”) and a black rice (which is in the grass family) dish so I thought I’d create a combo meal with two of my favorite types of grains and include some veggies I had around the house.

Keep in mind you can switch out any veggies or grain so let yourself be creative…you can also add your favorite cheese if you want to add a cheese to this recipe but I was trying to keep it healthy.

Based on my program (excluding the jalapenos), here are the facts per cake…Calories 74, Total Fat 1g, Total Carb 10g, Protein 4g

Print
Quinoa and Black Rice Cakes

Ingredients

  • 1 cup Quinoa, uncooked
  • 1 cup Black rice, uncooked
  • 3 large Eggs
  • 2 whole Zucchini, shredded
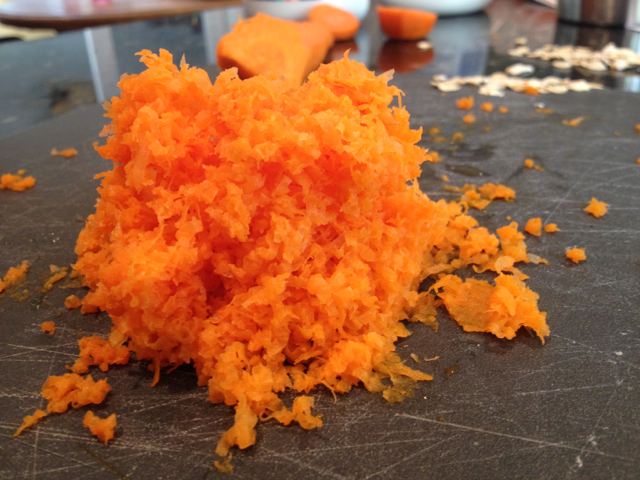
  • 1 whole Carrot, shredded
  • 1/2 Red onion, small chopped
  • 1 whole Jalapeno, with seeds if you want it hot, minced
  • 3 cloves Garlic, minced
  • 1/2 Red bell pepper, small chopped
  • 1/4 cup Cilantro, chopped
  • Salt & pepper, to taste

Directions

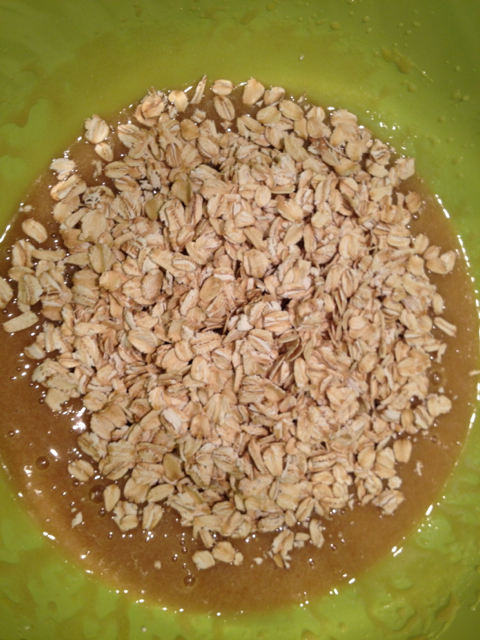
  1. Make your quinoa and black rice based on how package describes to make it. Drain from water, mix together and place in refrigerator to cool down.
  2. Preheat your oven to 375 degrees. Line a baking sheet with parchment paper and spray with a cooking spray...time to start shredding, shred and chop all your veggies.
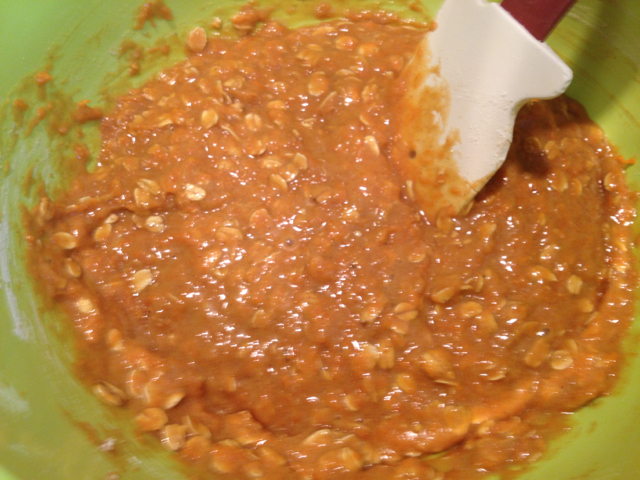
  3. In a large bowl add your quinoa, black rice, eggs and all the rest of your veggies. Stir until well mixed.
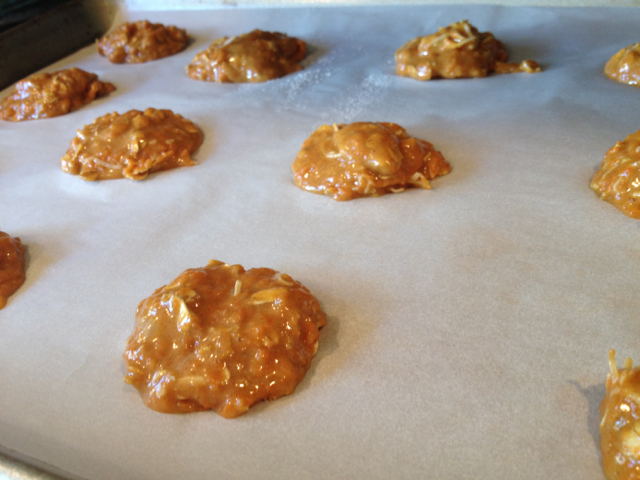
  4. I used a 3" ring and placed my mix in the ring, slightly pressing down, this way they are all the same size.
  5. I placed them all on a baking sheet and baked for 20 minutes...I removed them, flipped them and baked for an additional 5 min as I like them crispy...and YUMMMY!
  6. These can be placed in a container and warmed up in a toaster oven or microwave to enjoy at another time...or you can freeze them to eat at another time.
3.1
https://mmgood.com/quinoa-and-black-rice-cakes/
Recipe belongs to Patty @MmGood.com, please contact me to use for personal use

Filed Under: Appetizers, Side Dish, Vegetables Tagged With: appetizer, black rice, delicious, healthy, mm-good, mmgood, quinoa, recipe, recipes, side dish, vegetables, vegetarian, veggie, yum

White Chocolate Champagne Cake…Great for a “Girly” grown up birthday!

June 2, 2012 By Patty Limatola-Tanenbaum 1 Comment

Yep, it’s my birthday so I thought I’d make myself a “girly” cake as I so deserved it…lol!

…

Read More »

Filed Under: Cakes / Cupcakes, Desserts Tagged With: baked, birthday cake, champagne, girly, mm-good, mmgood, recipe, recipes

Sweet Corn on the Cob

May 27, 2012 By Patty Limatola-Tanenbaum Leave a Comment

I just love fresh corn off the cob…especially when it’s sweet and tender.  Often, in the beginning of the season, the corn is a bit tough and not so sweet…good I learned a secret or 2 about how to make it sweet and tender.

1. What my mom always said was to add a little bit of sugar to the water to sweeten it up

2. I was at my friend Melissa’s house (Mel I hope it was your house, lol) and they had corn in a pot and the water was cloudy…when I a asked why, I was told it was milk and that the milk helped to keep the corn tender

So now, I always add sugar and milk in the beginning of the season so I always get sweet and tender corn.

IMG_0555


Print
Sweet Corn on the Cob

Ingredients

  • 4 whole Corn on the cobs, husks removed and cut in half
  • 2 tablespoons Sugar
  • 3 tablespoons Milk
  • water to cover the corn
  • To Garnish - put dollops of butter on top of the corn and sprinkle with parsley (parsley makes all the difference)

Directions

  1. Place corn in a large pot, add your water, sugar and milk. Bring to a boil...when your water reaches a boil, reduce the flame and cook for 8-10 minutes.
  2. Remove from water, put butter and parsley on top and enjoy!
  3. (if you do not want the butter/parsley mixture, then just serve warm)
3.1
https://mmgood.com/sweet-corn-on-the-cob/
Recipe belongs to Patty @MmGood.com, please contact me to use for personal use


Filed Under: Side Dish, Vegetables Tagged With: boiled, butter, cob, corn, milk, mm-good, mmgood, parsley, recipe, side dish, sugar

Frozen Yogurt Drops

May 25, 2012 By Patty Limatola-Tanenbaum Leave a Comment

So I can’t even classify this as a recipe but it was a great “easy to do” type of thing I just had to share.  My daughter loves to be creative and tries things I never think of.  The other day, while we were grocery shopping, she asked for me to buy her a “whipped yogurt” cup and said she wanted to freeze it to see if it tasted like frozen yogurt.

That made me think…why not just put yogurt on a tray and freeze them…then I can have my own “frozen dots” in flavors I love.  I only had peach flavored yogurt but here was my go at it.  You basically take your yogurt and put in a pipping bag with a tip on it (I will share that I originally tried putting the yogurt in a pipping bag, thinking I was being all fancy.  It was much simpler to just use a teaspoon and put little dollops down…so what if they aren’t all perfect so I’d say skip the bag and use the teaspoon)

IMG_0504

line a baking sheet with parchment paper and make little circles of the yogurt

IMG_0509

place the sheet pan in the freezer and let it freeze for 30 minutes or longer.

IMG_0514

I will share that I originally tried putting the yogurt in a pipping bag, thinking I was being all fancy.  It was much simpler to just use a teaspoon and put little dollops down…so what if they aren’t all perfect.

IMG_0517

It’s perfect for summer so enjoy!


Print
Frozen Yogurt Drops

Ingredients

  • 1 container of your favorite Yogurt (or you can do multiple flavors/colors for fun)
  • Parchment Paper
  • Baking Sheet
  • Teaspoon

Directions

  1. I placed the parchment paper on my baking sheet. Using a teaspoon, I dolloped little amounts across the sheet. I placed it in my freezer for 1 hour...and then YUMMY we ate em all!
3.1
https://mmgood.com/frozen-yogurt-drops/
Recipe belongs to Patty @MmGood.com, please contact me to use for personal use

Filed Under: Desserts, Snacks Tagged With: dessert, easy recipe, frozen yogurt, healthy, mm-good, mmgood, recipe, recipes, snacks, yum

Oatmeal Sandwiches ~ Great for Breakfast or a Snack

May 23, 2012 By Patty Limatola-Tanenbaum Leave a Comment

So I’m one of those patients that sit in the doctors waiting room, I look through the magazines and then of course I’m going to find me a great recipe that I just have to try.  So, I end up asking the receptionist to print me a copy of a page…of course these days I pull out my cell phone and just take a photo.  Well, this recipe is one of those kind of recipes.

My son was home ill from school today so I thought what a perfect day to bake him some healthy (yes healthy) cookies.  The recipe said that they are really meant to be eaten for breakfast but we think they can be eaten any time of the day.  I did modify the original recipe by omitting 1/2 cup of raisins and I added a few more things to the mix.  If you like raisins…then add em…we are not fans of raisins.

You basically grate your carrots

IMG_0464

In a large bowl, add your oil, brown sugar, white sugar and egg. Mix until it’s well blended. Add your dry ingredients

IMG_0465

add your oatmeal, carrots and coconut flakes. Mix just until it’s all blended

IMG_0466

spoon onto your prepared baking sheets

IMG_0467

bake for 10-12 minutes

IMG_0470

while it’s baking you make your filling

IMG_0480

and you make little sandwiches out of them.  These cookies, wrapped and in the refrigerator, will last up to 3 days.


Print
Yummy Oatmeal Sandwiches

Ingredients

    For the Cookie:
  • 1 cup All purpose flour
  • 1/2 teaspoon Baking powder
  • 1/2 teaspoon Baking soda
  • 1 teaspoon Pumpkin pie spice
  • 1/4 teaspoon Salt
  • 1/2 cup Canola oil
  • 1/2 cup Brown Sugar, packed
  • 1/4 cup Sugar
  • 1 large Egg
  • 1 cup Old fashion oatmeal (not instant)
  • 1 cup Carrots, shredded
  • 1/4 cup Coconut, shredded
  • For the filling:
  • 6 ounces Cream cheese, room temperature
  • 2 tablespoons Maple syrup (or slightly more if desired)

Directions

    For the Cookies -
  1. Preheat your oven to 350 degrees. Line 2 baking sheets with parchment paper and set aside.
  2. Sift your flour, baking powder, baking soda and pumpkin pie spice together. Add your salt to this mix and set aside.
  3. In a large bowl, add your oil, brown sugar, white sugar and egg. Mix until it's well blended. Add your dry ingredients, oatmeal, carrots and coconut flakes. Mix just until it's all blended.
  4. Drop your dough, by tablespoons, onto the lined baking sheets about 2 inches apart. Bake for 10-12 minutes or until the edges of the cookies begin to brown. Remove from your oven and let cool.
  5. For the Filling:
  6. In a small bowl, mix your cream cheese with your maple syrup.
  7. To Assemble:
  8. After your cookies have cooled down (if they are too hot the filling will melt so make sure to wait until the cookies are cooled), spread about 1 tablespoon of the filling on the flat side of the cookie, top with the remaining cookie and enjoy!
  9. According to my program - if you are not using the cream and only eating the cookie as an individual cookie (the batch makes 24 cookies or 12 sandwiches)...each cookie is the following:
  10. Calories - 62
  11. Total Fat - .46g
  12. Cholesterol - 8mg
  13. Sodium - 68 mg
  14. Total Carb - 13.32g
  15. Protein - 1.30 g
3.1
https://mmgood.com/oatmeal-sandwiches-yummy/
Recipe belongs to Patty @MmGood.com, please contact me to use for personal use

Filed Under: Breakfast, Desserts, Snacks Tagged With: breakfast, cookies, dessert, easy, healthy, mm-good, mmgood, oatmeal, recipe, sandwich cookies, snack

Authenic Pasta Arrabiata Recipe…from my mom

May 15, 2012 By Patty Limatola-Tanenbaum Leave a Comment

As a child, I took a lot of things for granted…and one of the biggest things I took for granted was my mother.  Since mother’s day was Sunday and being that my mother passed away almost 19 years ago, I thought what a great way to pay tribute to her.

You see in my early 20’s, my mother invited me to go to Italy with her to visit my grandparents.  I am a first generation American and I had not met all of my extended family members so it would have been a great trip.  At the time, I had a job that would not allow for me to take time off and I had a very active life style that needed that job.  My sister Adriana went with my mother and I know it was a memorable trip for both of them and I know just how much my mother loved and neede that trip.

This simple recipe came from a cousin of my mothers, he had a pot of sauce (or gravy as we always referred to it) on the stove and was preparing for an Italian pasta dinner.  My mom “accidentally” knocked the pot off the stove top  and while she felt really bad about it, the outcome was that she learned how to make this easy and delicious sauce.  So for Mothers day, this year, I made it in memory of my mom and so thought I’d share this authentic, simple and tasty dish with you.

Penne


Print
Pasta Arrabiata

Ingredients

  • 1 tablespoons Olive Oil
  • 2 teaspoons Crushed Red Pepper flakes (more if you like it hot or less if you don't)
  • 1 small Onion, sliced thin
  • 4 cloves Garlic, chopped (I do a larger chop for this recipe)
  • 10 Roma tomatoes, cut in half and seeds removed (I only had 7 and it still worked but 10 better)
  • 3 tablespoons Italian Parsley
  • 1 pound Penne Pasta
  • 1 cup Pasta water (if needed)
  • Parmesan cheese
  • salt to taste

Directions

  1. Prepare a pot of water for your pasta. Follow the instructions on the package of your pasta. By the time your pasta is cooked through, your sauce will be ready to enjoy as well.
  2. In a skillet, place olive oil in pan and add your onions. Cook onions until they become tender and translucent 5-7 minutes.
  3. While your onions are cooking, cut your tomatoes in half, width way, and squeeze out all the seeds and juice. Do no throw away the juice or seeds as you may need them later on in making your sauce.
  4. When your onions are almost cooked through, add your red pepper flakes, garlic, salt and stir. Place tomatoes cut side down in your pan and don't touch them! Cover your pan (if the liquids start to evaporate to much, add some of the seeds and juice and then put the cover back on your pan. Cook for about 5 minutes. At this point your tomatoes should be nice and tender, I then take the back of a wooden spoon and I squish the tomatoes down.
  5. Drain pasta, reserving 1 cup of water (if needed), add your sauce on top of your pasta (add the pasta water if it's too thick) sprinkle with Italian parsley and Parmesan cheese.
  6. This dish can be served hot or cold.
3.1
https://mmgood.com/authentic-pasta-arrabiata-recipe/
Recipe belongs to Patty @MmGood.com, please contact me to use for personal use

Filed Under: Dinner Entree, Italian, Main Meals Tagged With: amazing, arrabiata, authentic, delicious, dinner, easy, Itlaian, kid friendly, mm-good, mmgood, pasta, penne, recipe, yum

  • « Go to Previous Page
  • Go to page 1
  • Interim pages omitted …
  • Go to page 41
  • Go to page 42
  • Go to page 43
  • Go to page 44
  • Go to page 45
  • Go to Next Page »

Primary Sidebar

Exclusive Offer

Never Miss a Post…

Meet Patty

My name is Patty Limatola-Tanenbaum and I am a “certified chef” who graduated from the Westlake Culinary Institute. While I have the experience from culinary school, I’m really only a home cook that loves to experiment and try new things. I am a single mom of two teenaged children and everyday my children teach me invaluable lessons about life.

Follow Me on Twitter

Recipe Archives

Follow me on Instagram

[instagram-feed]

Water Pie, a Recipe from the Great Depression!

@tea_4_2 Water pie with a twist, or 2! #waterpie #waterpies #simplerecipe #ididitmyway #easyrecipes #sundayfunday ♬ Fake – The Tech Thieves Water pie…sounds interesting right?  Was interesting for me as well as I had never heard of such a thing, a pie made of water.  I had to test it out.

INOTHEKE in Santa Monica by Patty Tanenbaum

A fun video I self-published…Inotheke is an astounding Greek Restaurant located in Santa Monica. Small plates that are great to share with authentic recipes, you will not be disappointed with this quaint restaurant that offers a great wine list.

Cafe Crepe in Sanata Monica

Another video I self-published – Cafe Crepe in Santa Monica – Looking for something sweet or savory in Santa Monica? Look no more for both options in crepes, as well as burgers and fries..here you just found the perfect restaurant Cafe Crepe!

Beef and Vegetable Bowl

Beef Bowl with Vegetables by Kelsi Tanenbaum I love when my daughter Kelsi creates recipes and then shares them with me. This recipe for her Beef and Vegetables Bowl is inspired by the Candida Diet which she currently is on.

BBQ Shrimp, Tomato & Sausage Kebabs

Wow, it’s been a while since I last did a post, however today I have a wonderful shrimp, tomato and sausage kebab that will be perfect for the summer BBQ’s!

Super Bowl Sunday Recipes – 2018

Superbowl Sunday…do you plan a party for the game?  the food?  the commercials?  for a gathering?  For me, I love it all, especially the gathering of friends.  To visit my personal recipes, please click here or on the above photo.

See More →
[Wow-Modal-Windows id=1]

Copyright © 2023 · Foodie Pro Theme On Genesis Framework · WordPress · Log in